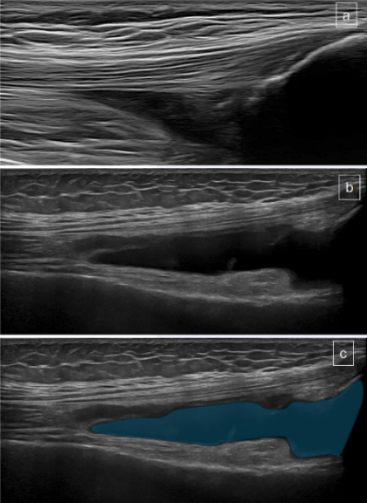
Anterior knee - long axis
Effusion with hypoechoic synovitis
DETAILS
Normal image (a)
Pathological image, (b)
Suprapatellar recess effusion as blue area (c=b), with moderate synovitis




Anatomy, ultrasound examination, pathology and ultrasound-guided injection techniques. complete clinical reference for daily practice.
The knee, a large joint dependent on ligaments for stability and muscles and tendons for function, is susceptible to a spectrum of acute and overuse injuries.
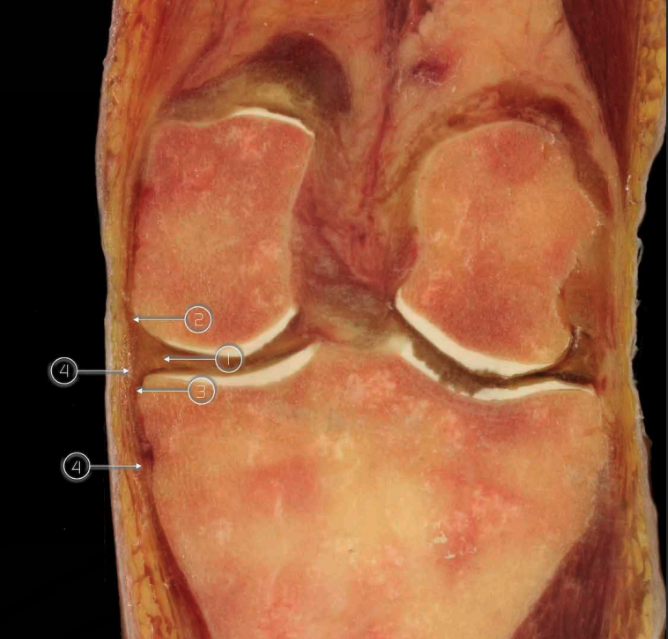
01 - ULTRASOUND EXAMINATION
Ultrasound has become a valuable imaging tool for the assessment of knee disorders, providing real-time visualization of periarticular and intra-articular structures such as tendons, ligaments, bursae, cartilage surfaces and joint recesses.
High-quality musculoskeletal ultrasound examination relies on the correct adjustment of machine settings — including depth, focus, frequency, gain and Doppler — as well as proper patient positioning and probe handling. Understanding fundamental scanning techniques and transducer movements is essential for optimizing image quality, minimizing artefacts, and ensuring accurate and reproducible assessment of knee structures.
A solid understanding of normal knee sonoanatomy is essential for accurate image interpretation. Assessing structures from different scanning orientations helps distinguish true pathology from imaging artefacts and improves diagnostic confidence
VIDEOPILL
Us methodology introduction
02 - PATHOLOGY
Ultrasound Exam: Pathology
The knee extensor mechanism is composed of the quadriceps tendon, patella, patellar tendon, joint capsule, suprapatellar recess, and Hoffa’s fat pad Understanding normal sonographic anatomy is fundamental for the accurate diagnosis of anterior knee disorders.
Anterior knee - long axis
DETAILS
Normal image (a)
Pathological image, (b)
Suprapatellar recess effusion as blue area (c=b), with moderate synovitis
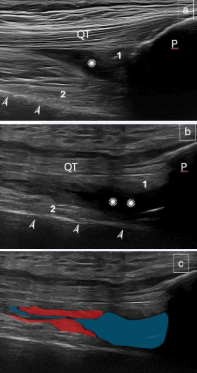
ANTERIOR KNEE – Long axis
DETAILS
Between the QT and the anterior aspect of the femur (➙) we can identify two structures:
Image a: The suprapatellar synovial recess (●), with small anechoic effusion with the suprapatellar fat pad (1)
Image b: The prefemoral fat pad (2), hypotrophic, just anterior to the anterior and distal femoral cortex (➙), and increased effusion (●●), proximal patellar cortex (P)
Image c = b: Synovitis, red area and effusion, blue area
We can dynamically compress this area with the probe in order to emphasize the presence of synovial fluid in case of minimal swelling.
See section 03 - Injection techniques - Intra-articular approach
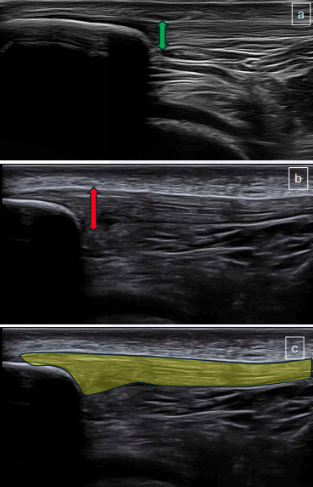
ANTERIOR KNEE – Long axis
DETAILS
Tendinopathy of patellar tendon at patellar insertion: note the tendon thickening (red arrow in b) in pathological knee, and pathological tendon (in yellow) in c
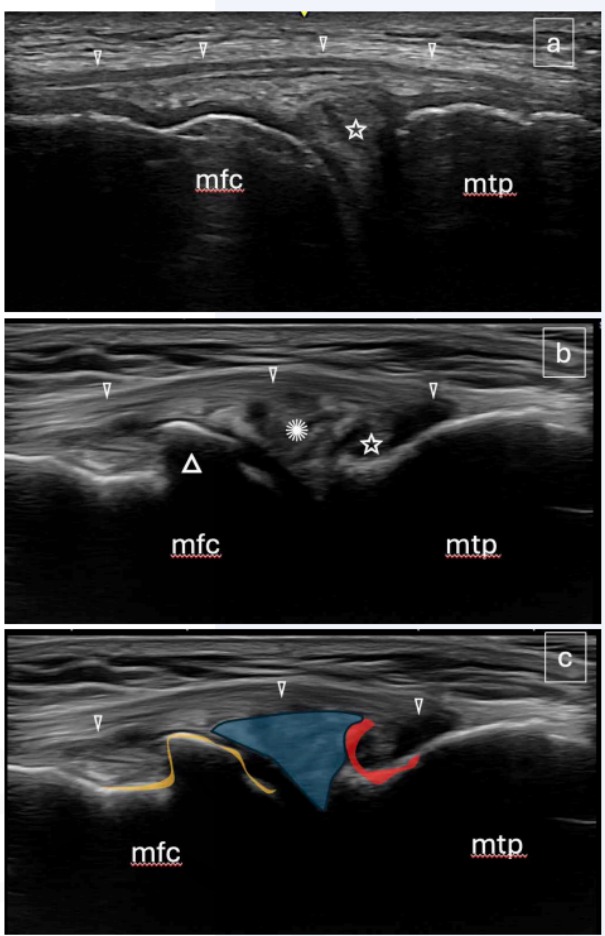
MEDIAL KNEE – Long axis
DETAILS
We can identify:
The MCL ligament integrity (⇒, image a,b,c)
The normal medial meniscus with its medial wall (☆, image a)
The pathological degeneration of MM with chondrocalcinosis and hyperechoic areas inside the heterogeneous MM: (●) in b, blue colored areas in c
The medial femoral condyle (mfc) and medial tibial plateau (mtp), a-b-c
Osteophyte (△) in b; yellow profile in c
Cortical irregularity at the tibial bone (☆) in b, red line in c
03 - KNEE APPROACHES FOR IA US GUIDED INFILTRATION
The essential tool for image-guided interventions
Beyond its diagnostic role, ultrasound is an essential tool for image-guided interventions, allowing precise targeting of intra-articular and periarticular structures and improving procedural accuracy, safety, and efficacy of injections.
COMPARISON
A: the probe is in «in plane» position, parallel to the needle. We can see the length of the needle.
B: the probe is in «out-of-plane» position, perpendicular to the needle. We can see a white dot.
APPROACH 01
Description
The needle is inserted parallel to the ultrasound transducer, so the entire needle shaft and tip are visible in the image as it travels toward the target.
How it Works
The transducer is positioned to create a long axis view of the needle, allowing real-time tracking of its entire path. The entire needle shaft and tip are visible as a continuous hyperechoic (bright) line on the screen.
Best For
Deep structures, vessels (arterial lines), joints, or when precise control is needed.
Procedure Steps
Align the probe to visualize the target structure in its long axis.
Insert the needle at one end of the probe, ensuring it remains within the narrow ultrasound beam.
Advance the needle while monitoring the tip in real-time until it reaches the target.
Key Advantage
Offers the safest visualization of the entire needle trajectory, including the tip, which reduces the risk of accidental injury to adjacent structures.
Key Disadvantage
Technically difficult because the probe and needle must stay perfectly aligned; even minor deviations will cause the needle to "disappear" from the screen.
APPROACH 02
Description
The needle is inserted perpendicular to the transducer, appearing as a bright, hyperechoic dot in the image.
How it Works
The operator views the needle in "cross-section," seeing only the tip and shaft reflections as it moves into the plane. The needle appears only as a small hyperechoic dot (cross-section) when it passes through the ultrasound beam.
Best For
Superficial targets (e.g., small joints), or when the needle path needs to be kept away from nearby nerves or vessels.
Procedure Steps
- Center the target structure on the screen in its short axis view.
- Insert the needle at the midpoint of the probe, a distance from the probe roughly equal to the target's depth (triangulation).
- "Walk-down" or "Creep" Method: To track the tip, advance the needle until the dot appears, then slide the probe slightly forward until the dot vanishes, then advance the needle again until it reappears.
Key Advantage
Easier to learn and typically requires a shorter needle path through tissue, leading to less patient discomfort.
Key Disadvantage
Difficult to differentiate the needle tip from a segment of the needle shaft, which can lead to accidental "overshooting" and injury to deeper structures.
APPROACH 04
US-guided infiltration procedures allow for a significant reduction in infiltration error compared to blind/bony landmark procedures. Learning how to perform an ultrasound-guided infiltration is like learning a technique, as is the case in orthopaedics with arthroscopy.
Real-time ultrasound guidance improves procedural precision, facilitates identification of the most suitable joint recess, and enhances patient comfort. A preliminary ultrasound assessment of the suprapatellar and parapatellar recesses is essential for selecting the optimal injection site and planning the safest needle pathway.
APPROACH 05
Ultrasound-guided injection through the superomedial suprapatellar recess is an effective technique for the intra-articular treatment of knee osteoarthritis, allowing accurate delivery of hyaluronic acid into the joint cavity.
A thorough pre-procedural ultrasound assessment is essential to identify osteoarthritic changes, evaluate joint recesses, and select the optimal needle pathway. Real-time ultrasound guidance ensures precise needle placement, improves procedural safety, and confirms successful intra-articular delivery through visualization of suprapatellar recess distension during injection.